Setting up the Epson TM-m30 and Epson TM-T88VI Receipt Printers in the Network
This How-To describes the setup for the Epson TM-m30. The descriptions also apply to the Epson TM-T88VI.
To add and use the Epson TM-m30 receipt printer in enforePOS, you need to register the printer in your network. In the first part of this How-To, you will learn which network settings are necessary. In the second part, you set up the receipt printer in the Epson User Interface. After the setup, you can add the receipt printer in enforePOS.
Requirements
You have an Epson TM-m30 receipt printer with an inserted receipt roll and a Wi-Fi adapter for the Epson TM-m30
You have a tablet, laptop or computer
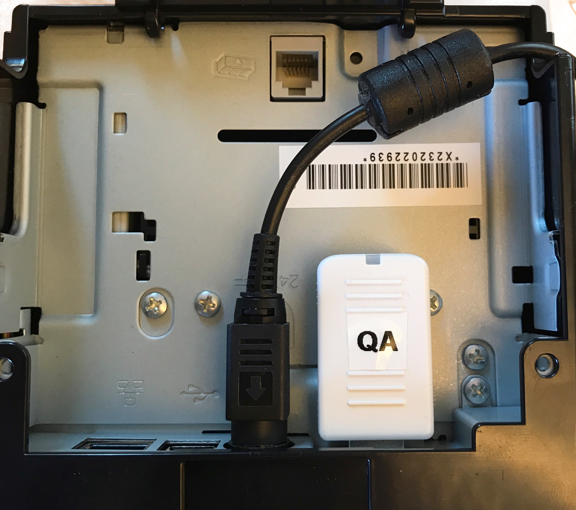
The Wi-Fi adapter is plugged into the USB port on the bottom of the receipt printer (see picture below).
Reset the Network Settings of the Receipt Printer
The menu of the TM-m30 receipt printer is operated with the button (Paper Feed). The receipt printer prints the information that is important for the next step.
Turn off the receipt printer.
Hold the button and switch on the receipt printer with the key .
Let go of both buttons. ⮕ The receipt printer prints the device information.
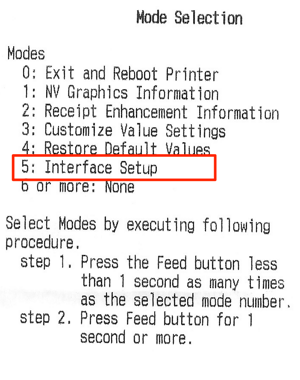
To access the receipt printer menu, press the button for more than 1 second. ⮕ The receipt printer prints the settings of the device menu Mode Selection.
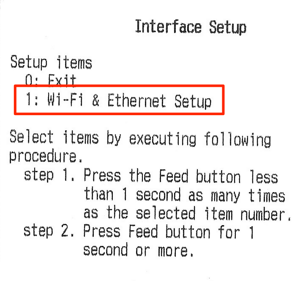
At 5: To access Interface Setup, press the button 5 times shortly and once long. ⮕ The receipt printer prints the settings in the Interface Setup menu.
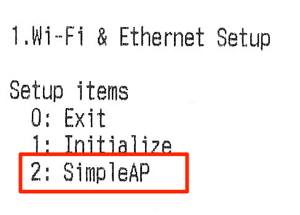
At 1: To access Wi-Fi & Ethernet Setup, press the button once shortly and once long. ⮕ The receipt printer prints the settings from the Wi-Fi & Ethernet Setup menu.
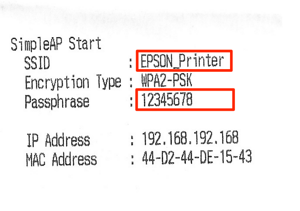
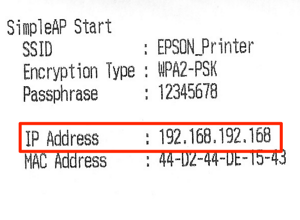
At 2: To open Simple AP, press the button twice shortly and once long. ⮕ The receipt printer prints the settings in the Simple AP menu and starts the internal access point to reconfigure the Wi-Fi settings.
Connecting a computer or tablet to the Epson Printer network
Search for the network Epson Printer on your computer or tablet.
Enter the password 12345678 (WPA2-PSK).
Setting up the Wi-Fi network via the web interface of the Receipt Printer
If your computer or tablet is connected to the Epson Printer network, you can edit the network settings of the receipt printer via the web interface. To do this, follow these steps:
Open a browser.
Enter https://192.168.192.168 in the address bar of the browser. If you get a message that the connection is not secure, you can establish an unsecure connection.
Log in with the username epson and the password epson.
This password only applies to older printer models (until the end of 2020). If your printer displays an error message at this point, you may have a newer printer model (end of 2020 or later). In this case, enter the serial number of the printer as the password.
Go to Configuration > Network > Wireless.
Enter the name of your Wi-Fi network in the SSID field.
Please note that your router SSID does not contain special characters, the ß and the file number.
Under Encryption Type choose WPA-PSK (AES).
Enter the password for your network under WPA Pre-Shared Key.
Confirm the setting with [Send].
In the next window tap on Reset.
⮕ The Receipt Printer is connected to your Wi-Fi network and prints information about the IP address in the network.
Connecting the Printer to the enforeDasher or enforeComet
If you have included the printer and your enforeDasher or enforeComet in the same network, you still need to configure your printer and assign it as a Receipt Printer.
To find out how to connect your printer to your enforeDasher or enforeComet, see our How-To Add a Receipt printer to the enforePOS Business Account.
Connect the Printer to the enforeDonner
If you have connected the printer and your enforeDonner to the same network, you still need to configure your printer and assign it as a receipt printer. How to connect the printer to your enforeDonner is explained in the How-To Assign Receipt Printer to the enforeDonner.
 (Paper Feed). The receipt printer prints the information that is important for the next step.
  .
.